I'm still trying to finish a couple of things on my HBS Creatin' Contest entry but I'll do most of the remaining things next weekend as it involves spray painting and it's cold outside. So I try to do little projects here and there when I find some time. For so long, I wanted to make some headphones inspired mainly by Nunu's House's Headphones and the other blue headphones below.

TUTORIAL - Miniature Headphones
To start with, I chose 2 colors of fimo, black and Indian red (which in the pictures looks more like pink). You don't really need any other thing than that. The only thing you'll need is a kind of a thin cord for the cable.

1) To give the headphones' upper part a round shape, you will need a round object that you can put into the oven. I found it easy to use a glass jar with a diameter of 1,6cm (0.63 inch).
2) Roll your black polymer clay into a 2mm (0.08inch) wide cane.
3) Press lightly and roll the jar on your working mat so that it gets flatter, approximately a millimeter. You do not need the two ends of the can so you don't need to make a complete round.
4) Cut off both ends of the cane, make sure that more than half of the bottle is covered, the edges should be long enough to curve again to the interior. Once you cut off the edges, divide the main body into two equal lines, which should stay connected for approximately half a cm at the edges. Put the glass into the oven when it's still cold (if you put the bottle into the preheated oven, it may break due to the sudden heat increase). Only then turn the oven on and bake it at the recommended heat for your polymer clay for about 15 minutes.

5) Once the main body cools down, take it off the bottle and add to each line, some clay (in your secondary choice of color) to make some sort of padding for the upper side of the headphones. I made little lines on the side of these to give them a more realistic look. As the cooked piece will be very smooth due to the fact that it was baked on glass, the extra clay may not stick well. I used some instant glue to fix the fresh clay to the main body. Bake this piece for another 25 minutes.
6) Using a cutting tool, make two circle pieces of approximately 1 cm of diameter, and two circles that are slightly smaller. These 4 pieces should be very fine, the ones I made are roughly thinner than 1mm. Also make 2 rectangular pieces which may be a little thicker approximately 0.5 x 0.2 mm. Bake these.
7) Glue the rectangular pieces on the both outer ends of the head piece.
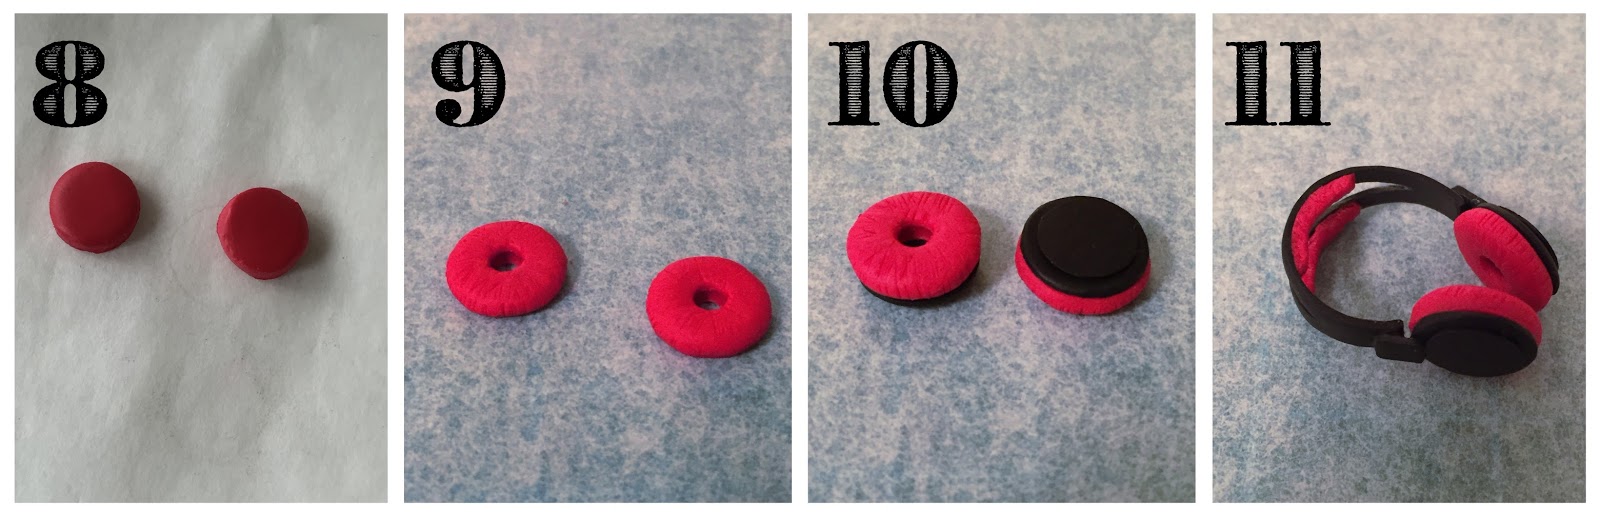
8) With your cutting tool, cut out again 1 cm wide round pieces of your second clay, which should be a little thicker than 2mm.
9) Shape these in form of ear pads with a hole in the middle. As before, I made lines and cracks on the sides as well as on the body to give it a more realistic effect. These pats should be flattened a little so that they become slightly larger than the black circles that were prepared previously.
10) Glue the smaller circle on top of the bigger one, then the ear pad on the other side of the bigger circle. I used instant glue for this again, please note that instant glue sticks extremely fast with polymer clay, so that once you put your pieces onto each other, you won't be able to move them much further to replace them. Keep calm and try to fit these in one shot :)
11) Once the ear pieces are ready as well, glue the ear pads onto the upper piece onto the edge of the rectangular pieces you previously had glued.
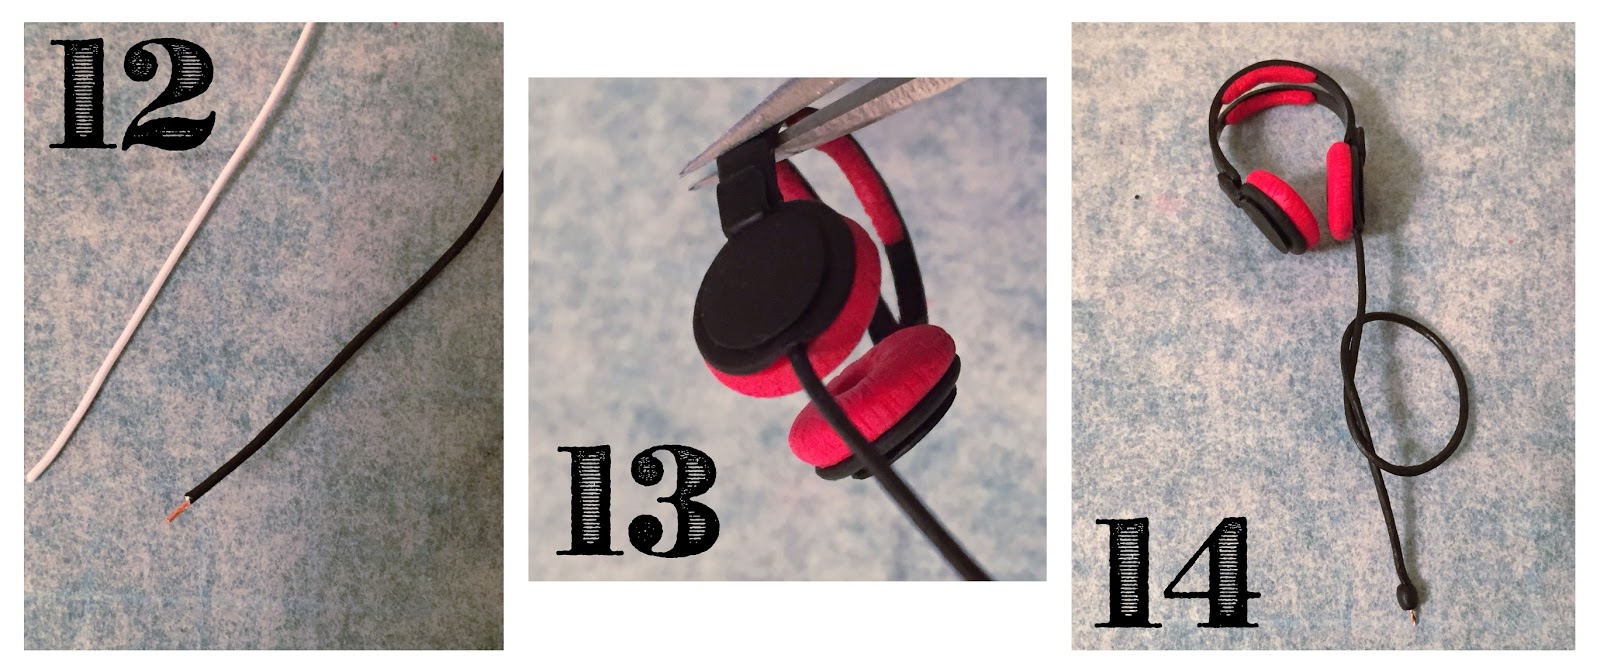
12) You're almost there, but you still want your headphones to look technically accurate, therefore they need a cable. I used some electrical wire that I usually use to wire a dollhouse by dividing it into two. As my wire was white, I painted it into black with some black aquarel color. I preferred to use an electrical wire, as I was able to cut of the end of the cable, to make it look like a jack.
13) With a needle tool, try to open a little hole between the black circles and the ear pad where you can squeeze the cable in. Put some instant glue onto the end of the cable and glue it in the little hole you made.
14) Voilà! You're done, your very own miniature headphone is ready to rock your ears!
Let me know if you have any ideas how it could be made better. I hope you enjoy :) - Susi


